That means I can really get back to working on Duchess. I finally found a new water heater. The type I use is a manual and the majority of water heaters are electronic. Was hoping to get parts but no one has them so I will be getting the complete 6 gallon heater for Duchess...basically replacing the same model.
So I added some more trim to the Easter Egg to see how it looks. I need to add some decorative trim around the middle but then it's done. To make an egg you need a styrofoam egg, either loose or compact, fabric (cut into 2" by 3"), a lot of pins, I used sequin pins which are shorter than regular pins, a scissors and then trim.
The best way to start making the egg is to make lines from top to bottom. First divide it in half, then each half into quarters. This is not an absolute requirement but it does make it easier to keep the rows straight.
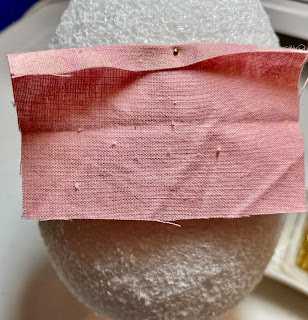
To make a prairie point take one piece of fabric, right side down, fold down about a quarter inch and pin in the folded part close to the top as shown.
Pin the fabric to the egg...
Fold down the right side and pin as shown...
Repeat on the left side, then pin the two corners at the bottom as shown...
Some folks overlap the two folds and use only one pin. I prefer this way even though it uses one more pin. Don't worry about the fabric at the bottom, it will be covered.
So, now that you know how to make a prairie point, find the top center of the egg and place four prairie points so that they cover the entire top part of the egg. For the second row and from then on, use 8 prairie points. To keep the points in line, I use a 3 by 5 card and indicate the space from the top of the point to where you place the top of the next row of points with a pencil. I can refer to that mark to make sure the rows are in line.
For the top part of the egg, I add prairie points about 2/3rds of the way down, then turn the egg over and repeat the process finishing the bottom 1/3rd. When they meet, I add a ribbon or a piece of the fabric to cover the unfinished part of the egg.
It's really easy to do, and very repetitive. You may want something to push the pin in to save your fingers. Hope you give it a try.
See you tomorrow...


