Each day is a gift, enjoy and treasure it!

I love the dusty pinkish rust color of these flowers. Just perfect for fall.
If you have any girls on your gift list, especially elementary and junior high, these journal necklaces are very popular right now. The great thing is that they are very inexpensive to make. All you really need is a piece of copy paper, a small piece of card stock and some fabric scraps. A glue stick, tacky glue, cellophane tape and a scissors rounds out the list. A paper cutter (like those used in scrapbooking) speeds up the work.
Today's how-to post has lots of photos. There are numerous videos on YouTube showing how to create pages easily. This is my version of making the folds. Be sure to crease each fold you make.
Cut a one inch strip lengthwise from a sheet of copy paper. (You can make two complete journals out of one sheet.) Fold in half lengthwise...

Fold each end inward to the center fold...

Fold each side out to the center fold...

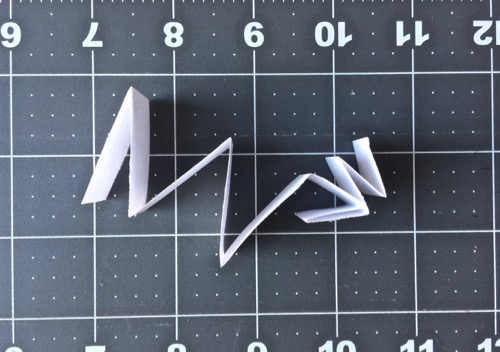
Unfold...

Refold as shown...

Fold the outside single piece to the folded edge, then fold the top of the next fold inside to the bottom of the fold...
Continue folding until all folds are folded in half and unfold...

Refold...

Repeat the process with two other pieces of paper for a total of three folded strips. Note: You can fold it other ways to achieve the same result; or, you can mark off one inch spaces with a pencil and fold.
Once you have all three strips folded, over lap the end pieces and using a glue stick, glue them together...

Next, and this is obvious, but it's like magic. Lay the strip out and using a glue stick make two swipes over the strip. It's best to do this about ten folds at a time so the glue doesn't dry.

Then fold the strip together. One fold of two sides makes one page in the journal. This is what you will end up...

I use clips to secure the pages and let dry completely before continuing.
For added strength, I use a small piece of fabric to cover the spine and onto the end pages. Tacky glue is applied liberally for this step. Allow plenty of time to let the glue dry.

To make the cover, I use card stock. Cut a strip a bit taller than the pages. For the first piece, fit the card stock close to the book. Fit the second piece to the first cover. The third piece should fit the second cover but include flaps.

Glue the first cover to the second cover and the second cover to the third cover BUT DO NOT glue down the extra flaps. It is these flaps that hold the pages in the cover.

After the covers are glued, I use tape to attach the flaps going from top to bottom and leaving the inside open. Now you can use fabric and tacky glue to cover the book, again making sure that the flaps are not glued. Here's a couple pictures of my first book...


The bottom picture shows how the end page slips under the flap. By placing an end page under the flaps on each side, the pages do not have to be glued and it is much easier to write.
I am planning on included two extra refills with each Journal. A necklace chain can be added by using an awl to make a hole at the top of the spine on the cover and inserting a ring. You can then add a chain to the ring.
That's all there is to making a necklace journal. It's easy, inexpensive and fun. Give it a try...you can make them any size you want. Heck, you can even make one for yourself!!!
I got a walk in today of almost two miles while running errands. I picked up some stew meat and some split peas. It's supposed to get cool this week...great for stew and soup...and I am looking forward to both.
Thanks for spending a few minutes with me...
Talk to you later...